Getting started with Apple Home may seem like a daunting task, but it’s actually a very easy system to manage. Setting up Apple Home for the first time is simple and ensures seamless access to your smart devices. The Apple Home app provides an intuitive way to control all your smart home devices from one place.
The Apple Home app enables automation, allowing devices to work together based on time, location, or sensor activity, enhancing convenience and energy efficiency.
Remote access via a Home Hub (Apple TV, HomePod, or iPad) lets you monitor and control your home from anywhere. Plus, with Siri integration, you can manage your smart home hands-free using voice commands.
I have broken the process down into 4 key stages.
- Initial Set up: Setting up the Home App
- Adding Home Members
- Adding Accessories
- Adding Automation
In reality, adding home members can happen at any stage but location based automations are very useful. (see later).
Table of Contents

Getting Started with Apple Home: Initial Setup
Start by opening the Home app on your iPhone or iPad. If prompted, tap Get Started to create your smart home setup. Here are the steps to follow if you are creating your Apple Home for the first time.
Click to Expand Detailed instructions on setting up Apple Home.
- Open the Home App On your iPhone or iPad, open the Home app. If prompted, tap Get Started to begin setup.
- Create a Home Give your home a name (e.g., “My Home”). Choose a home location if necessary.
- Enable a Home Hub (Optional but Recommended) A Home Hub (Apple TV, HomePod, or iPad) is needed for remote access and automation. If you have a Home Hub, ensure it’s signed into the same iCloud account and is turned on. I recommended the HomePod or AppleTV over using an iPad.
Getting Started with Apple Home: Home Members
Adding Home members also enables location-based automation. You can trigger an action when someone arrives at or leaves home. More on this in the Apple Home automation section.
Expand to see detailed instruction on how to add home members:
- Open the Home app on your iPhone or iPad.
- Tap the More button (three dots) in the top-right corner.
- Select Home Settings.
- Tap Invite People under the “People” section.
- Enter the person’s Apple ID email address.
- Tap Send Invite.
Getting Started with Apple Home: Adding Accessories
There are a wide range of Apple HomeKit accessories that enhance convenience, security, and automation. These include smart lighting (such as bulbs, switches, and LED strips) that allow you to control brightness and color via the Home app or Siri.
Smart thermostats help regulate home temperature and improve energy efficiency. Smart locks and doorbells provide remote access control and visitor notifications, while security cameras and motion sensors enhance home monitoring. Smart plugs and outlets let you turn traditional devices on and off remotely.
The TP Link Tapo P110M start plug is one of the best Apple HomeKit devices to get you started. ( Amazon Affiliate: TP-Link Tapo P110M). Note” Some plugs offer energy monitoring, but this is not currently supported by Apple Home.
Additionally, garage door openers, blinds, fans, humidifiers, and automated irrigation systems can all be integrated into Apple Home for seamless automation. Support for HomeKit, Matter, and Thread ensures compatibility with a growing ecosystem of smart accessories.
If you’re just getting started with Apple Home, the good news is that some Apple HomeKit products are added via their own hub/bridge. For example, adding the Philips Hue Bridge adds all your Philips Hue accessories, including lights, buttons, and motion sensors. If you want to start your smart home journey, the Hue Lights system comes highly recommended.
Amazon (Affiliate): Philips Hue Starter Kit
Click to expand detailed instructions on how to add an accessory.
- Open the Home app on your iPhone or iPad.
- Tap the + (plus) button in the top-right corner.
- Select Add Accessory.
- Scan the HomeKit setup code (usually found on the device or its packaging). Do not lose this code.
- If scanning doesn’t work, tap More Options and select the device manually.
- Follow the on-screen instructions to complete the setup.
- Assign the accessory to a room and customise its name for easy control via Siri.
- Tap Done when finished.
The Apple Home Interface
The Apple Home interface features input sensors at the top, followed by any scenes you have created (see later), and then finally the accessory controls for each room. There is also a whole home view that shows all the accessories you have allowed in this view. If you are just getting started in Apple Home, your main focus will be the controllable buttons, which appear as large squares in each room.

This screenshot demonstrates the room view. If you have more than one of a type of accessory, Apple Home displays it as a range (e.g., Temperature and Humidity). If you’re just getting started, your interface may feel a little sparse until you add more accessories. My advice is to build your smart home over time.
Getting Started with Apple Home: Scenes
A scene in the Apple Home app is a preset group of smart home actions that you can activate with a single tap or voice command via Siri. Scenes allow you to control multiple accessories at once, setting them to specific states.
Examples of Scenes:
- Good Morning – Turns on the bedroom lights, adjusts the thermostat, and starts the coffee maker.
- Good Night – Turns off all lights, locks the doors, and lowers the thermostat.
- Movie Time – Dims the lights, and turns on the TV Plug.
- Leaving Home – Turns off lights, locks doors, and sets the thermostat to an energy-saving mode.
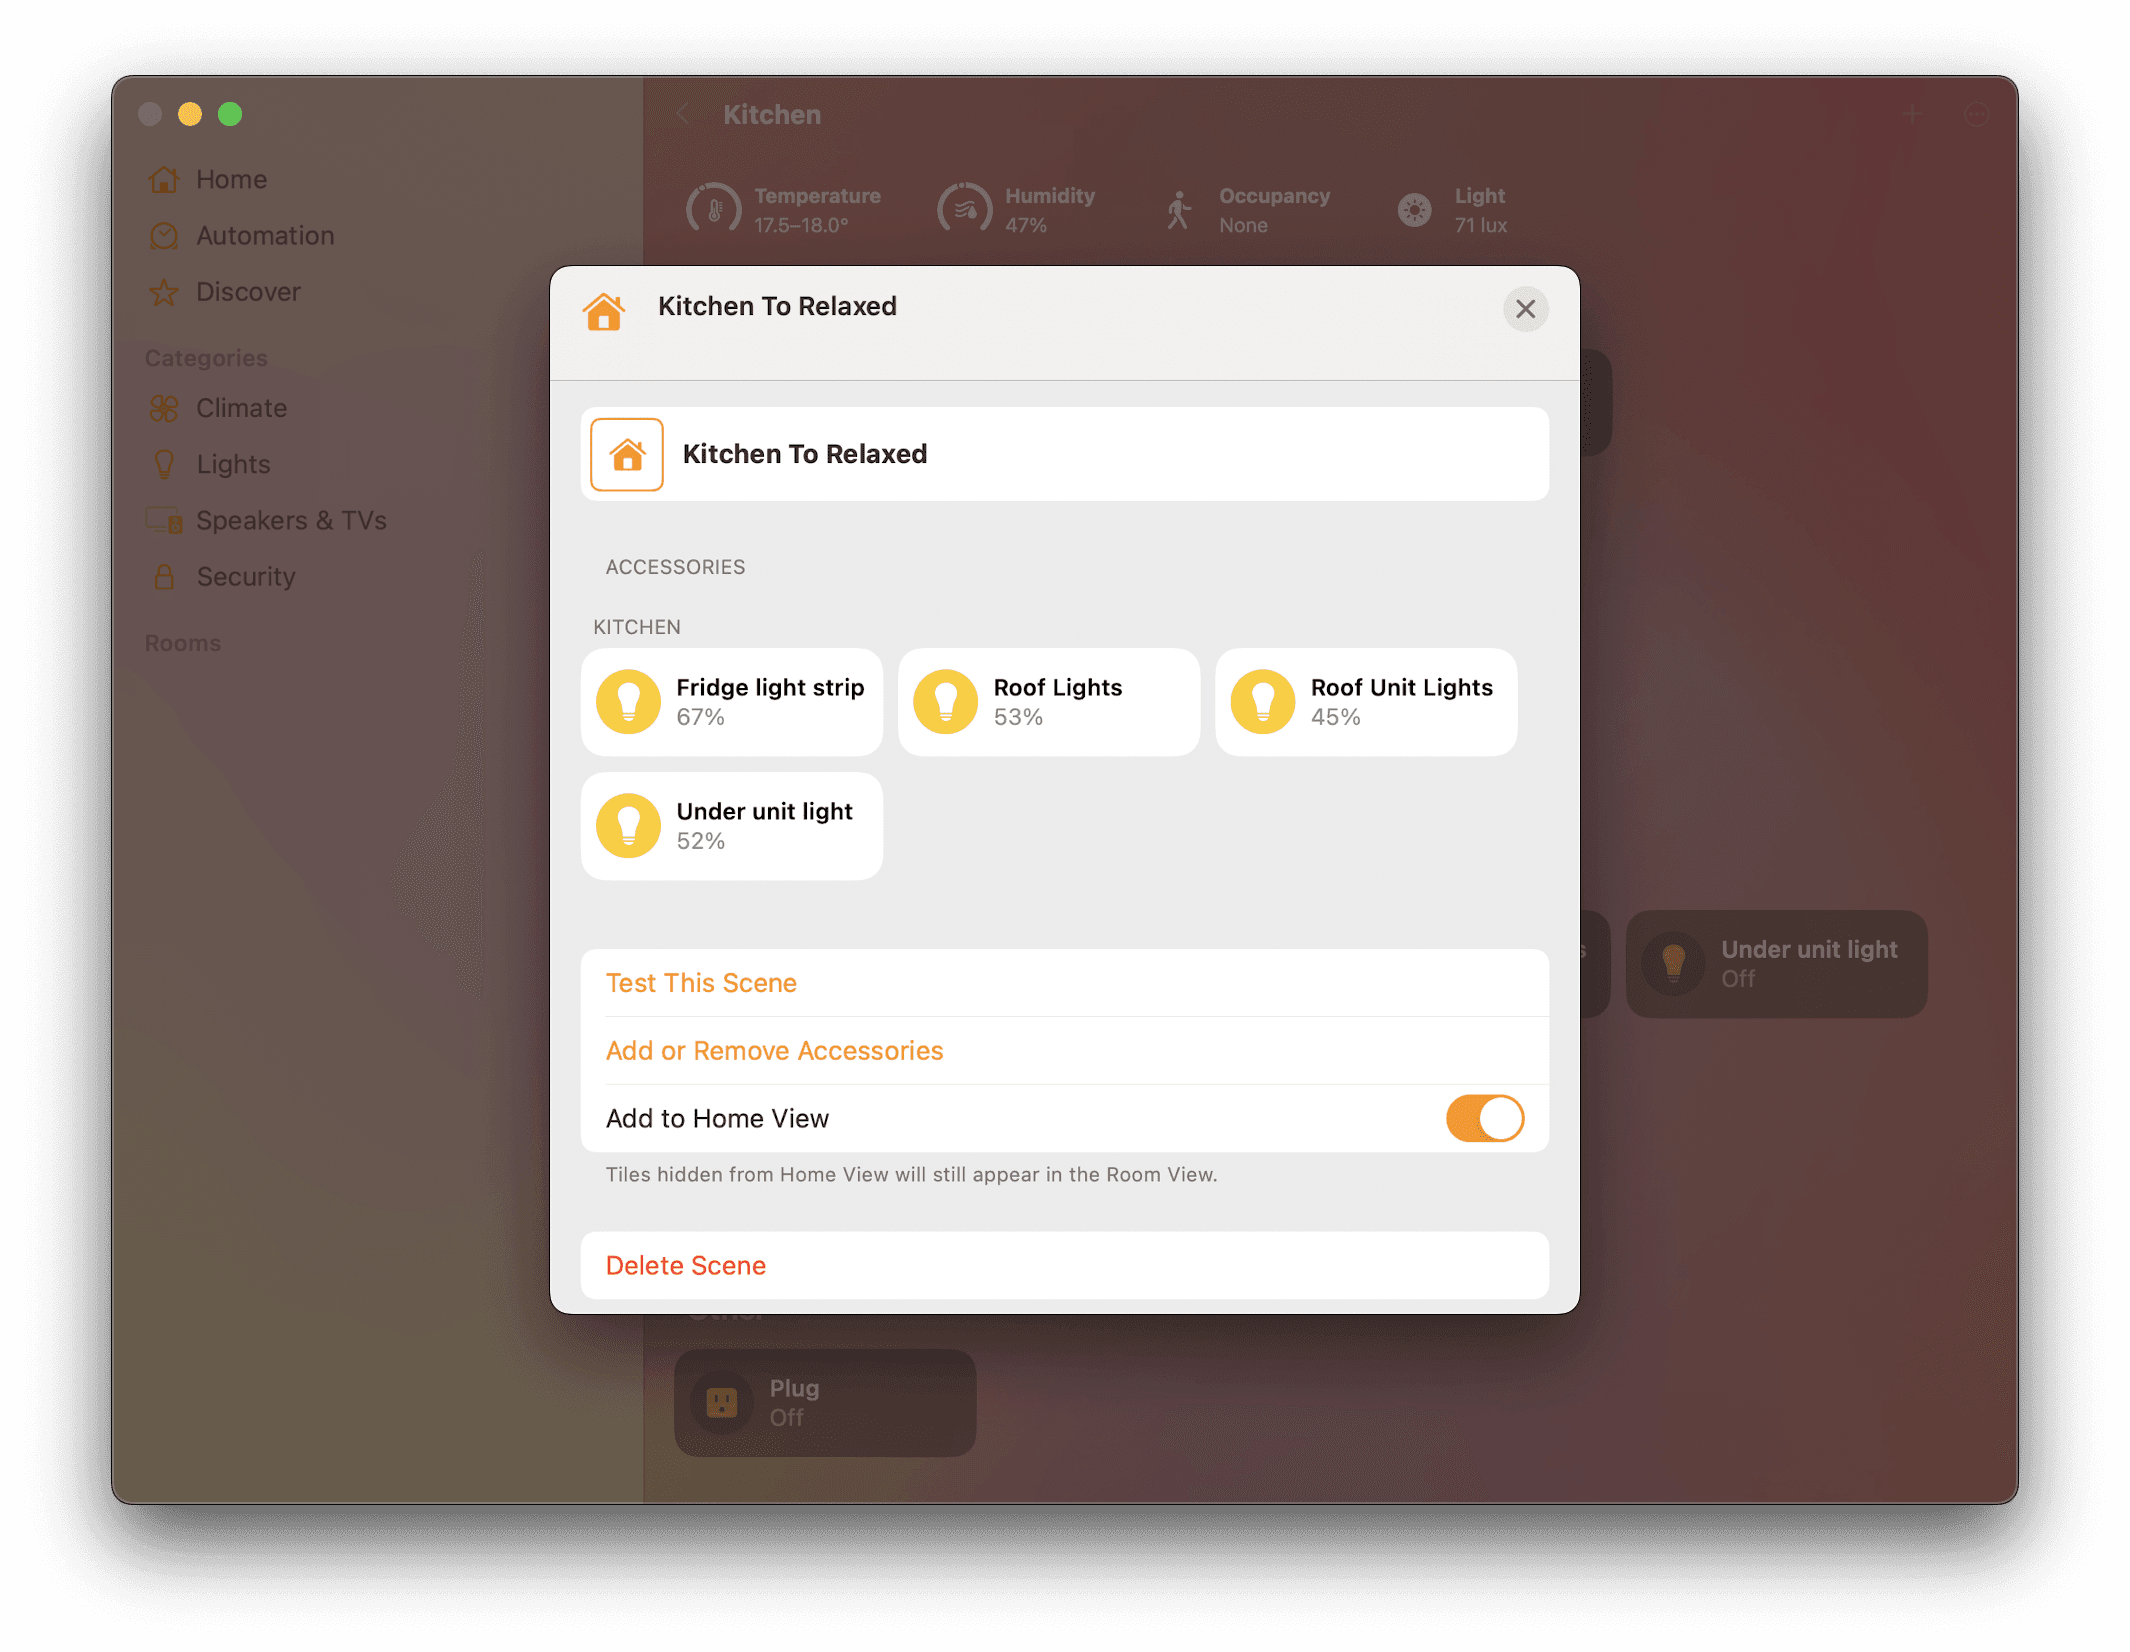
These are great, sample automations if you are just getting started with Apple Homekit. As your experience grows, you can adjust and create custom scenes. I have many lights and scenes for different moods, like Christmas, reading, etc.
Steps to Create a Scene:
Click here to expand detailed instructions on creating a scene:
- Open the Home app on your iPhone or iPad.
- Tap the + button in the top-right corner.
- Select Add Scene and choose a suggested scene or create a custom one.
- Add accessories and set their desired states.
- Name your scene and optionally assign it an icon.
- Choose if you want to trigger it automatically (via automations) or manually.
- Scenes can be triggered via the Home app, Siri, or set to run automatically based on conditions like time of day, location, or other accessory states.
Getting Started with Apple Home: Automation
An automation in the Apple Home app is a rule that automatically triggers smart home devices based on specific conditions, such as time, location, sensor activity, or the state of another device. Automations help you streamline your smart home experience without needing to manually control accessories or scenes.
Bonus Sensors
It’s a good time to mention that the Apple HomePod offers both temperature and humidity sensors that appear in the Home App. See above. The Phillips Hue Motion Sensor offers temperature and light level measuring on top of tracking motion.

Example Automations:
- Time Based – Triggers at a specific time or sunset/sunrise (e.g., turn on lights at sunset).
- People Location Based – Activates when you or someone in your home arrives or leaves (e.g., turn off lights and lock the door when the last person leaves home or increase the temperature when the first person arrives home).
- Sensor Based – Responds to sensor input, like temperature, motion, or contact sensors (e.g., if a motion sensor is activated and it’s night time turn on the light for 5 minutes.
Example Automation I Use Daily:
A great energy-saving automation is turning off all the lights at 8 AM, regardless of who’s at home.
Click to expand detailed instructions on creating automations
- Open the Home app on your iPhone or iPad.
- Tap the Automation tab.
- Tap + (plus) to create a new automation.
- Choose a trigger (e.g., time of day, arriving home, motion detected).
- Select the accessories or scenes you want to activate.
- Configure conditions and options, then tap Done.
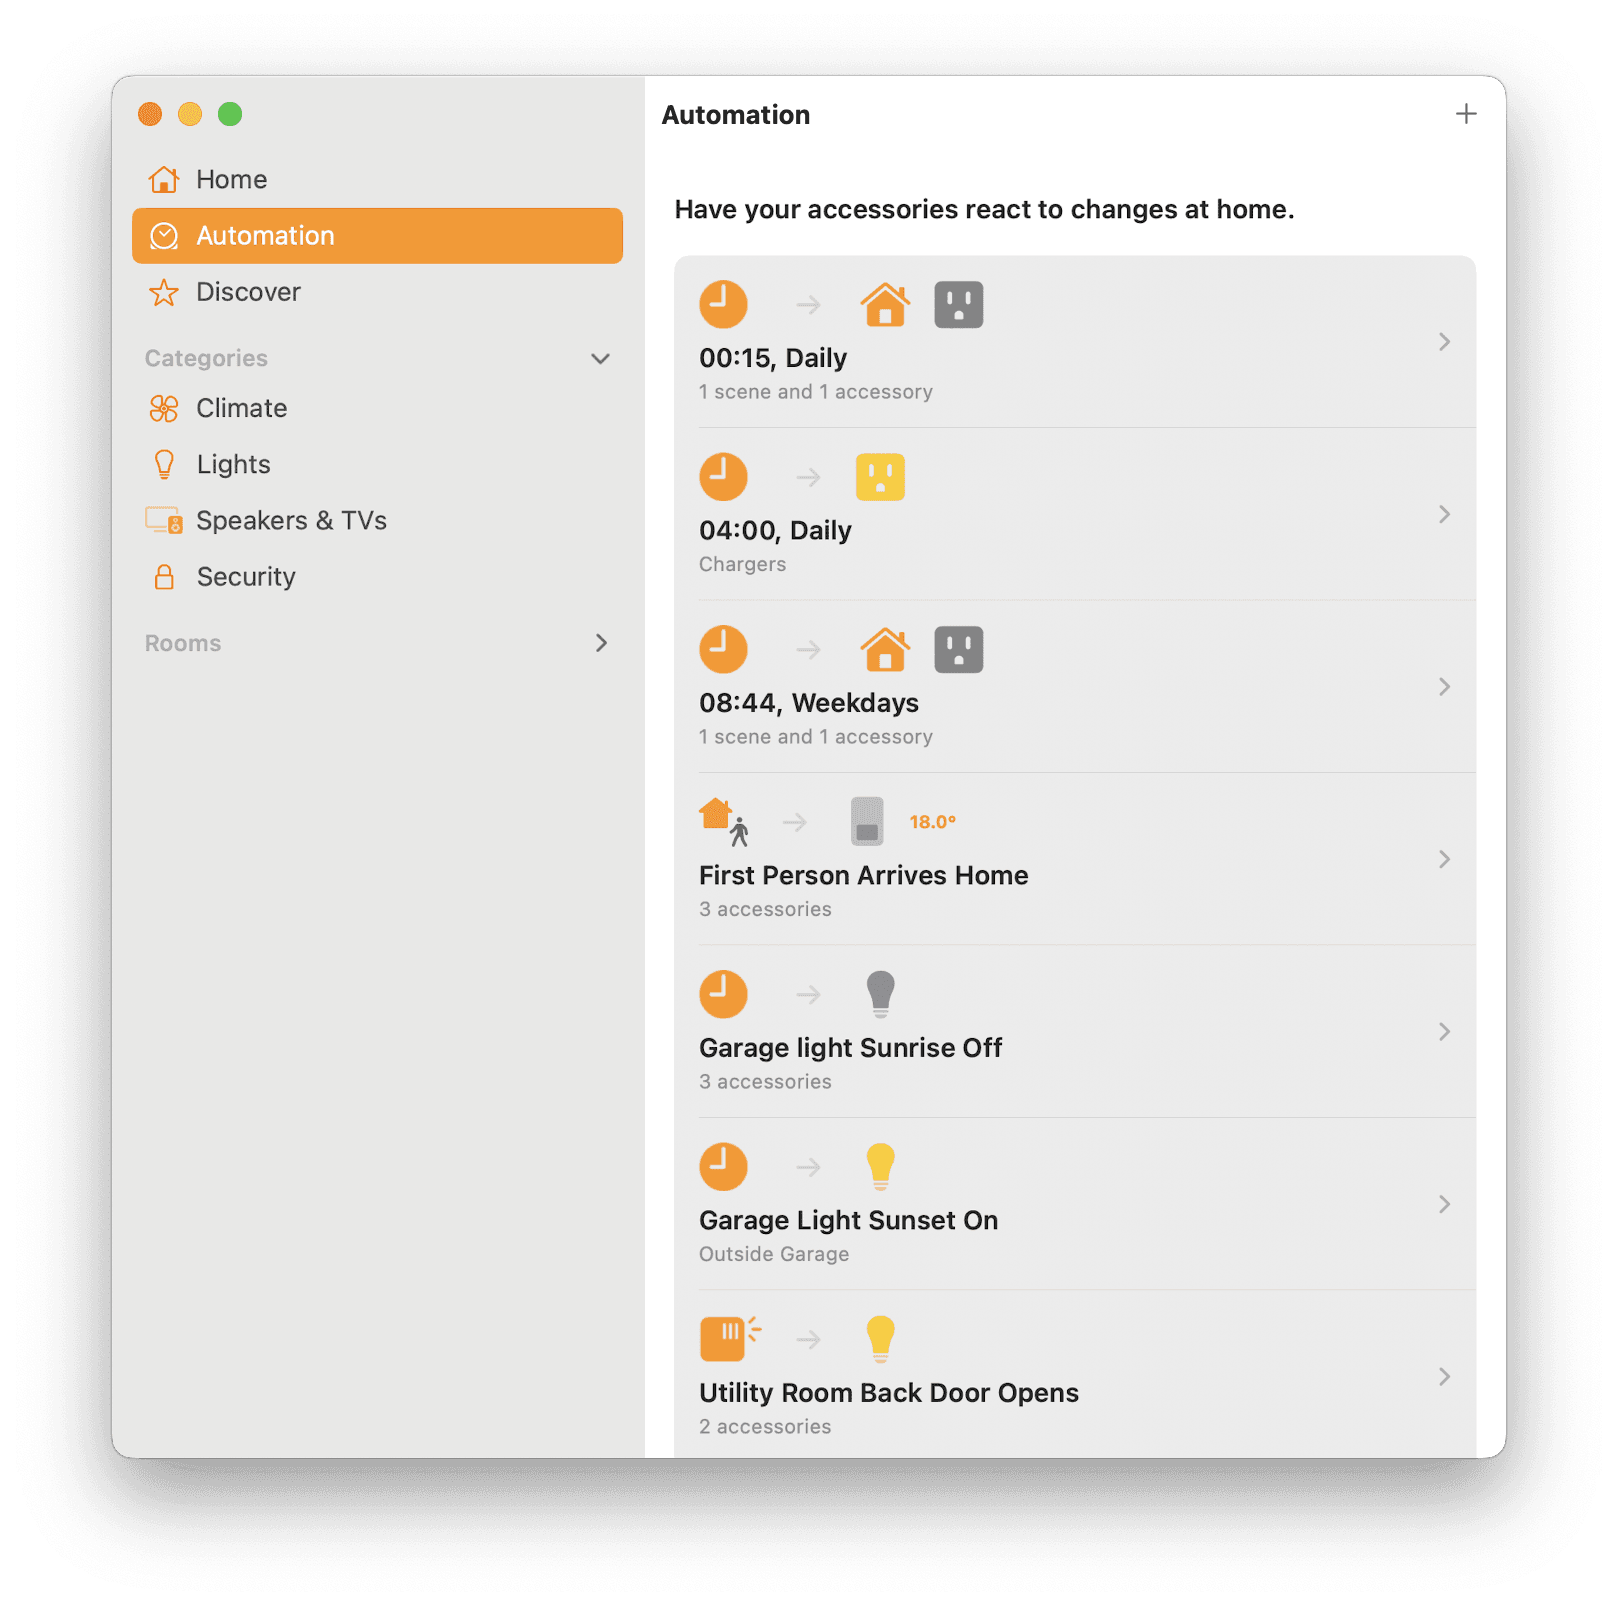
Automations require a Home Hub (Apple TV, HomePod, or iPad) to process them even when you’re not at home. I recommend using an Apple TV or HomePod over using an iPad.
Conclusion
I hope this serves as a great first step for those getting started with Apple Home. The Apple Home app is user-friendly and offers a great home interface for the whole family. The system offers simple and reliable automation for a growing range of hardware.
Apple Home isn’t perfect. For example, its automation programming is functional but lacks advanced customization options. Additionally, Apple Home doesn’t allow you to trigger alerts/notifications directly from the app. It will notify you of some operations, such as doors opening, but custom alerts aren’t supported.
If you’re looking for data logging, you might want to consider running Home Assistant alongside your Apple HomeKit system. That said, if you’re getting started with Apple Home, there’s more than enough to keep you occupied as you grow your smart home.
Links:
Can Smart Plugs Save you Money?
The Eve Aqua for Apple Home
Linking Google Nest to Apple Home
Apple Home Accessories :
If you are just getting started with Apple HomeKit the following are great devices to add to your Smart home eco system. Amazon Affiliate Links:
TP Link Tapo P110M Plug
Tapo Matter Power strip
Phillips Hue Starter Kit
Phillips Hue Motion Sensor
Aqara P2 Matter Door & Window Sensor
Eve Aqua Tap Control.
Footnote: What is the Difference between Apple Home and Apple HomeKit?
Apple Home and Apple HomeKit are related but not the same. Apple Home refers to the Home app, which is the user interface for managing smart home devices on iPhone, iPad, Mac, and Apple Watch. It’s where you control accessories, setup automations, and invite users.
Apple HomeKit is Apple’s smart home framework that allows compatible devices to work within the Apple ecosystem. It ensures security, privacy, and seamless integration with Siri and iCloud.
In short, Apple HomeKit is the technology, while Home is the app that lets you interact with it. Official Apple Home.