


The Ecowitt Wittboy Weather Station marks the third chapter of my journey into weather monitoring. I started with the Eve Weather Station before transitioning to the Netatmo, each with its own pros and cons—whether it was battery life limitations or struggles with wireless range. My goal was to find a system that could reliably collect data for long-term trend analysis.
The latest chapter in my weather station journey is the Ecowitt Wittboy Weather Station (7-in-1). While it’s a bit more expensive than my previous setups, a year in, it’s still going strong, consistently delivering reliable data.
Table of Contents
Ecowitt Wittboy Weather Station Set up
I purchased the Wittboy Weather Station along with the GW2000 hub as a single package, and the setup was exceptionally straightforward.
To get started, insert two AA batteries into the sensor’s battery compartment (accessible with a screwdriver). When the LED on the back of the sensor lights up for three seconds and then blinks every 8.8 seconds, it indicates that the sensor is transmitting data.
The Wittboy Weather Station and GW2000 Hub Set Up Steps:
- Connect the hub to your Wi-Fi router using an Ethernet cable and find its assigned IP address via DHCP.
- Enter the IP address in your phone’s browser to access the embedded web page.
- Log in (no password required), then enter your SSID and Wi-Fi password to complete the Wi-Fi setup.
Ecowitt devices communicate over their own dedicated radio frequency, eliminating Wi-Fi range issues. This independent network not only keeps things separate but also provides impressive connectivity range.
Amazon Links (Affiliate)
The Wittboy Weather Station
The Ecowitt Temperature Sensor
The Ecowitt Irrigation Timer
Mounting Pole
Wittboy External Installation
I mounted the Wittboy at the side of our greenhouse using an aerial pole purchased from Amazon (see links at end of post). I was concerned about radio range but the app was being populated with data by the time I had pointed the station to the North.
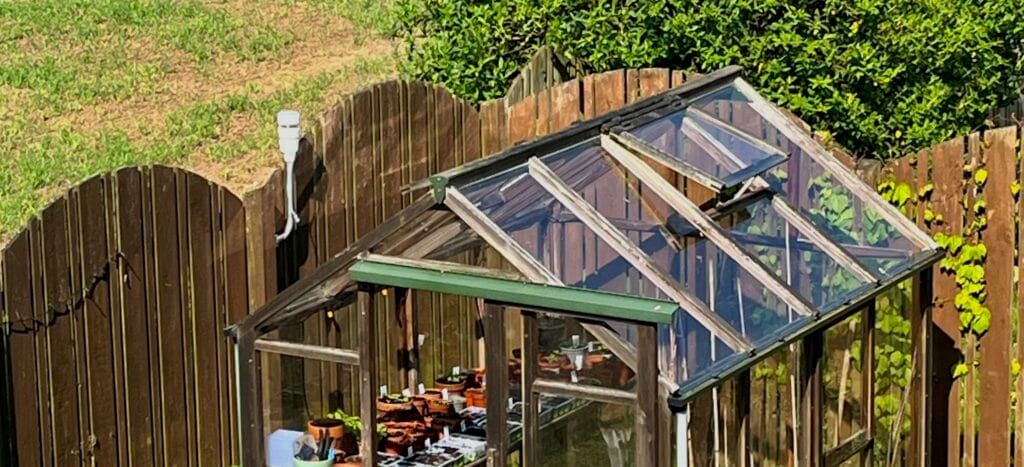
As you can see I have pretty poor location when it comes to logging wind information. It’s the most subtle area, anywhere else was going to be a focal point, something I wanted to avoid. For this reason I take the wind data with a pinch of salt.
Long Term Power Management
Note: Lithium batteries are recommended for outdoor use, and after a year, my original set is still going strong. In fact, Ecowitt specifically advises against using alkaline batteries.
Please avoid alkaline batteries, especially when the internal heater is to be activated during cold and wet weather conditions as when the heater is activated, the trapped heat inside will warm up internally.
Alkaline batteries are extremely susceptible to leakage when the temperature is over certain limits. (ECOWITT).
The solar charging performance is especially impressive from March through May, with the battery rarely needed. It’s only during the winter months that I notice any battery usage. As shown in the graph, overall energy consumption remains minimal throughout the year.
Click any image on this post to view full size:

It was actually interesting to see the different in solar charging when it hit the end of October. This has already started to improve (early February) with the capacitor doing more of the work with a longer periods of daylight.

Connecting the Wittboy Weather Station to the Network
For network connectivity, while Wi-Fi is an option, I chose to connect the Ecowitt GW2000 hub via Ethernet. This decision was based on the fact that my hub is located at the edge of my Wi-Fi network. Since this is an IoT device, I limited its communication so it couldn’t interact with other devices on my network.
Once set up, I paired the system with the Ecowitt app. I opted to use the free Ecowitt cloud service to store the data, though this isn’t required. You can choose to make your Wittboy Weather Station public, allowing it to appear on a map, or keep it completely private— I chose the latter.
Wittboy External Heater
The Wittboy Weather Station comes with a built-in thermostat heating plate. When powered by an external 12V/1A source, the heat plate automatically activates below 5°C (40°F) and turns off above 10°C (50°F), melting snow and ice while keeping the anemometer functioning. The same 12V/1A power supply also powers the device itself. So far, I haven’t found the heater to be essential.
The Ecowitt App
You can access your data either through a web browser or the dedicated Ecowitt app. Both options offer the same functionality, but it’s especially nice to view the data on a larger screen via the browser.
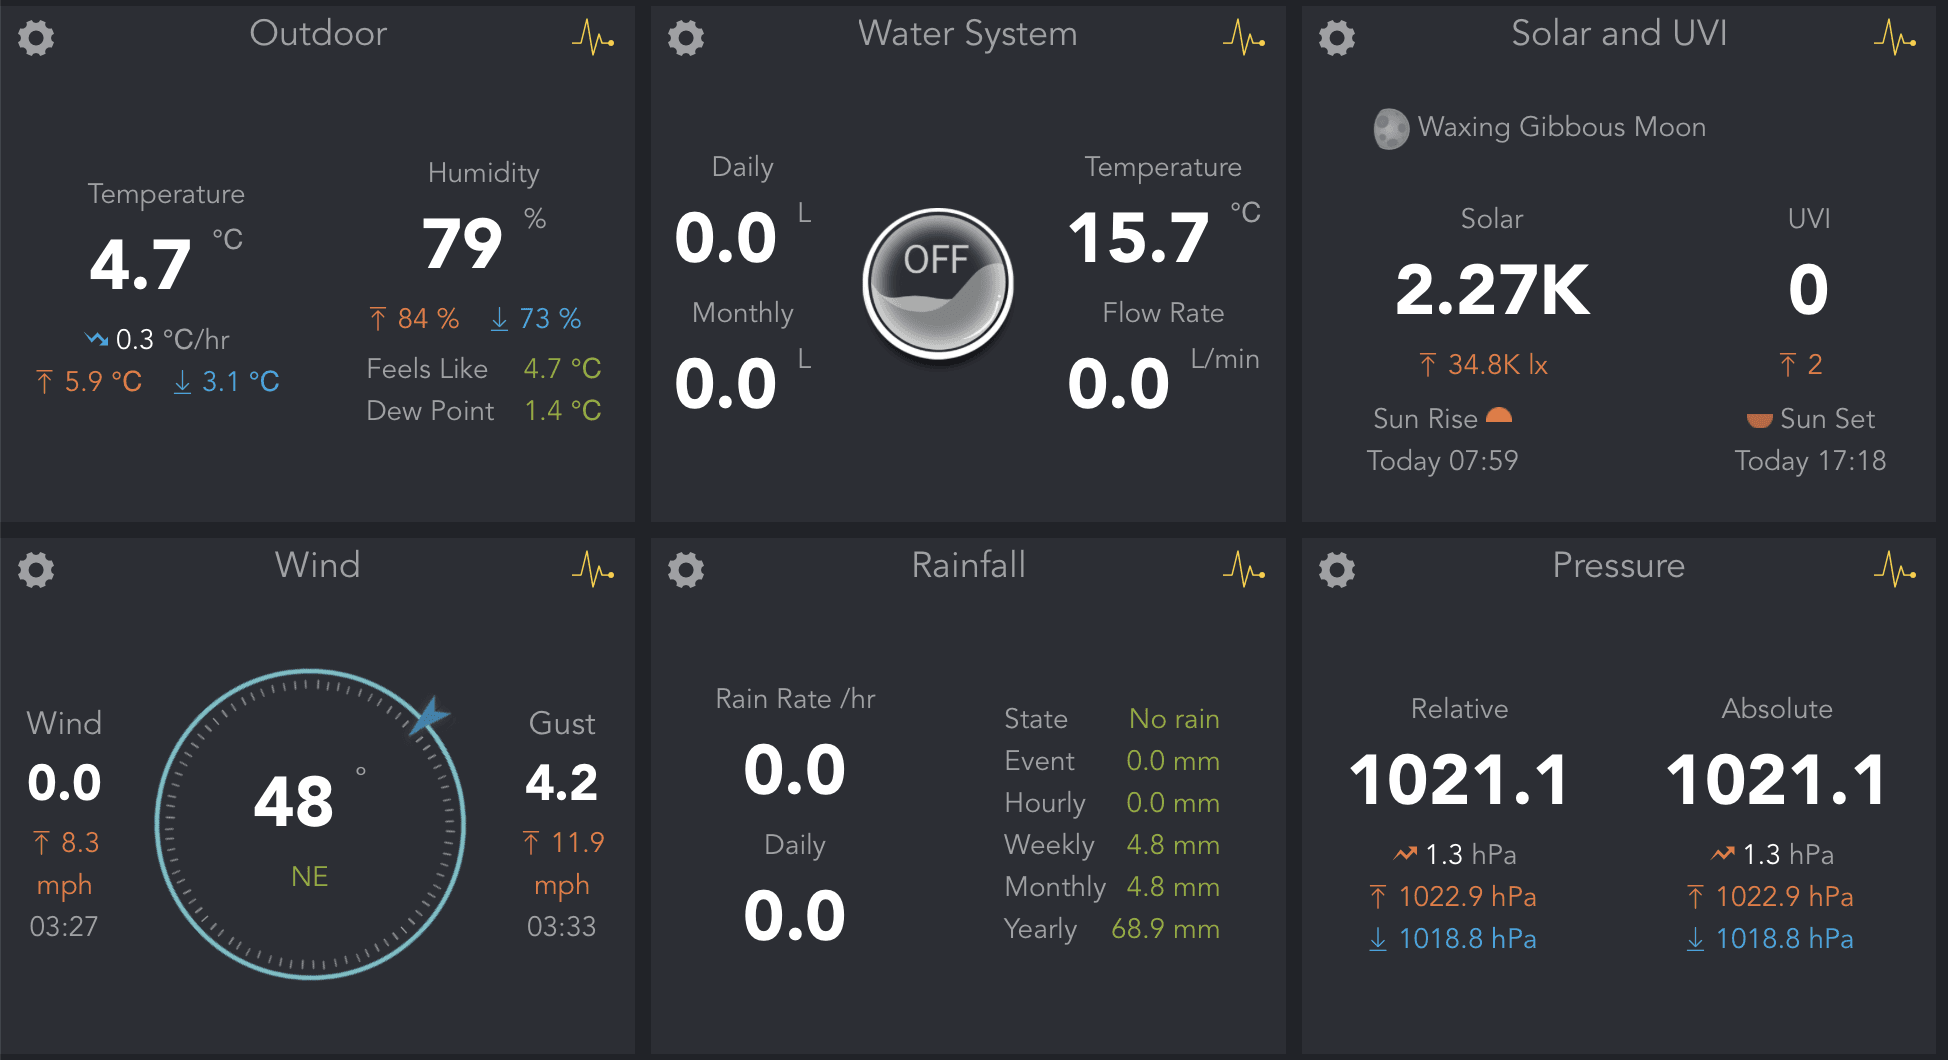
Data: The Wittboy Weather Station
The Wittboy Weather Station collects a wide range of data. It wasn’t until I connected the system to Home Assistant (more on that later) that I truly appreciated the extent of the data being recorded..

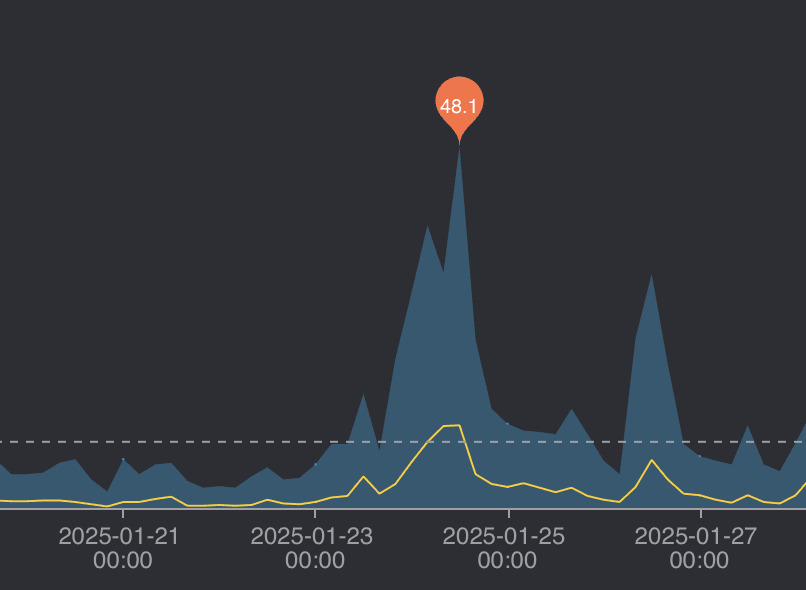
The graph below shows January 2025 Wind data as measured by the Wittboy Weather Station. You can see the peak of storm Eowyn.
The graph is likely an under-representation of the storm. My Wittboy Weather station isn’t situated in the best location for monitoring wind as it is slightly sheltered on the north side.
The Wittboy Weather Station features a Haptic Rainfall Sensor at the top, which accurately measures rainfall volume in detail, with rain detection and rain stop interpretation functions. Unlike traditional sensors, this sensor doesn’t vibrate, making it more reliable in harsher weather conditions.
Data : The Ecowitt GW2000 Hub
The GW2000 hub is not just the controller for the Wittboy Weather Station, but it also collects indoor temperature and humidity data. This data is stored within the Ecowitt app, which also provides indoor dew point temperatures.
Weather Service Integrations
The Ecowitt cloud service provides a variety of weather service integrations, including Wunderground, Weathercloud, and WeatherObservation. I’ve been using Wunderground for just under a year.
The setup is straightforward, and while Wunderground offers similar graphs to the Ecowitt app, the presentation is slightly more simplified. The graph below shows the Wittboy Weather Station data as displayed on the Wunderground website.

Data from internal sensors is not shared via Wunderground (eg internal temperature etc).
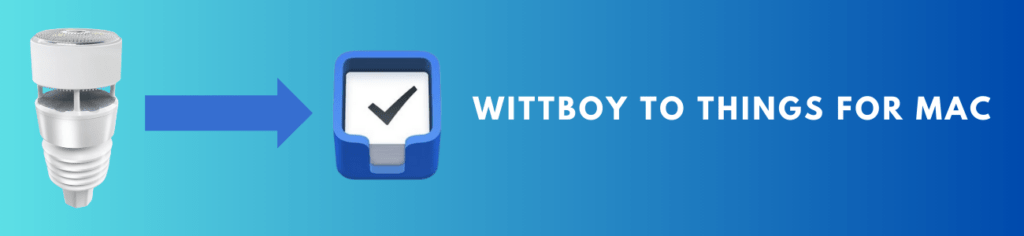
Ecowitt Email Alerts and Things for Mac
The Ecowitt weather app allows you to set up email alerts based on user-selected criteria, which is a great feature. I started with about twelve different alerts, but over time, I’ve refined them. One important alert I have is to notify me if the battery voltage drops below a certain threshold.
Taking it a step further, modern to-do apps like Todoist and Things allow you to email tasks directly to the app. Instead of receiving alerts in my inbox, I now have them appear in the Things inbox, where I can easily assign a project and deadline.
While Ecowitt allows alerts to be sent to multiple email addresses, one drawback is that the system sends all alerts to all addresses. You can’t filter specific alerts to specific email addresses, but this is a minor issue in practice.
Ecowitt and Home Assistant
I use Home Assistant to collect data and control various aspects of my smart home system. Connecting the Wittboy weather station to Home Assistant was straightforward, and it allows me to customise graphs and set specific ranges for important data. I can also trigger actions based on activity, such as receiving notifications if it starts to rain. These alerts are about 90% accurate, which I find quite impressive. Note the Ecowitt Wittboy weather station is not compatible with Apple Homekit.
How to add Ecowitt to Home Assistant
Connecting the Ecowitt system with Home Assistant is very straightforward.
Steps: (Followed at your own risk).
- Install the Ecowitt Integration in your Home Assistant Installation.
Link: Ecowitt Home Assistant Integration. - Use the Ecowitt App (on your phone):
- Ensure you are on the same wifi network as your Wittboy weather station.
- Select the Menu Icon () on the upper left, then My Devices → Pick your station
- Select the Ellipsis Icon () → Others
- Select DIY Upload Servers → Customized
- Make sure to choose ‘Protocol Type Same As: Ecowitt’
- Enter the Server IP / Host Name, Path, and Port from the integration (installed in step 1).
Note: The path has to match! Remove the first forward slash from the path, as the app will prepend one. - Hit Save.
- Navigate to the Ecowitt web UI in a browser at the station IP address:
- Select Weather Services then scroll down to ‘Customized’
- Make sure to select ‘Customized: 🔘 Enable’ and ‘Protocol Type Same As: 🔘 Ecowitt’
- Enter the Server IP / Host Name, Path, and Port from the integration.
- Hit Save.
Ecowitt doesn’t support TLS/SSL, you can use the NGINX TLS Proxy Add-on to support HTTPS and HTTP at the same time.
Once you have the Wittboy Weather station connected you can now create dedicated weather dashboards into Home Assistant. I have combined live forecasting data with my Ecowitt historical data. See the data screenshot below.

The Smartmixin App
Not satisfied with just the Ecowitt app and Home Assistant, I also use an affordable app called Smartmixin to collect and display my weather data.
Smartmixin is a fantastic little app that provides a simple way to view summary data for a year or month. I use it to maintain a spreadsheet of weather records, both for each month and for all time. There is both a MacOS and iOS version of the app and the data is easily exported out to .CSV.
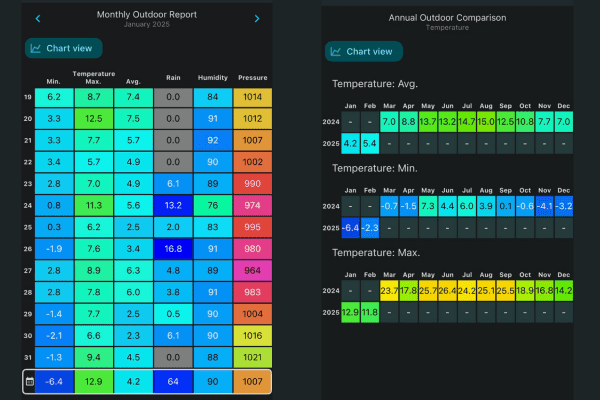
SmartMixin offers a wide range of ways to view your data. Some views overlap with those available on the Ecowitt app but the historical data and comparison information is terrific. See two sample screen shots below. Again click for a larger view.
I have a repeating task in Things to copy the records for the previous month to a separate spreadsheet. My current records for temperature and rain are below. For the vast majority of the year the maximum daily rain fall recorded by the Wittboy weather station is 16mm. The 23rd November changed that entirely.
Current Weather Records:
| Highest Temperature | 26.4 °C | 24th June 2024 |
| Lowest Temperature | -4.1 °C | 27th Nov 2024 |
| Highest Daily Rain | 47.5mm | 23rd Nov 2024 |
. Checkout: SmartMixin

Ecowitt Device Expansion
Over time, I’ve added several devices, all connected through the same GW2000 hub:
- Air Quality Monitor
- 4 Ecowitt Wireless Digital Thermometer Hygrometer Monitors
- 1 Soil Moisture Monitor
- Ecowitt Irrigation Timer WFC01 Unit
The first two devices provide a variety of data, which I primarily use for alerts or triggers within Home Assistant automations. The temperature and hygrometer monitors are especially valuable—they not only transmit data back to the hub but also feature an on-screen display. An added bonus is that Ecowitt devices use standard AA or AAA batteries, which is a huge convenience. The temperature sensors and soil sensors currently cost less than £20 per unit(See bottom of post).
The irrigation timer and moisture monitor have clear practical uses, and I’ll go into more detail on both in a future post. One thing to note is that while the WFC01 unit is excellent, it’s not currently supported by Home Assistant.
The (Almost) One Year Conclusion
The Ecowitt Wittboy Weather Station is a powerful and reliable environmental monitor that’s as easy to set up as it is to use. The data it collects is consistently accurate, and it continues to perform well in even the harshest weather conditions. I haven’t needed to reboot or reset the device—it simply delivers a steady stream of weather data quietly in the background. The battery life across the Wittboy and its accessories has also been impressive.
I haven’t had to replace any batteries in the past eleven months. I especially appreciate the email alert feature, which sends notifications to Things when a battery needs replacing.
The Wittboy is so dependable that I even started to question whether the battery data was accurate. I posted on support forums, worried that the battery meter wasn’t functioning correctly. As it turns out, everything is working perfectly!
If you’re in the market for a weather station that’s easy to set up, effortless to manage, and reliably delivers a wealth of data, the Ecowitt Wittboy Weather Station is definitely worth considering. With its user-friendly interface and consistent performance, it’s a standout choice for anyone looking to monitor the elements.
Related Links:
Amazon Affiliate Links:
The Wittboy Weather Station
The Ecowitt Temperature Sensor
The Ecowitt Irrigation Timer
Mounting Pole


